Alpha Omega’s main Easter Egg can be completed SOLO or co-op. No four-player requirement.
1. ⚡ Turn on the power
Head into the Power House and activate the power.
You’ll quickly discover that simply flipping a switch isn’t enough.
Go toward the bunker entrance and begin opening access to the underground facilities.
2. ☣️ Clear the ventilation system
Head underground.
You’ll find four ventilation units around the bunker.
They’ve become contaminated.
Activate the ventilation sequence and eliminate zombies around the vents to clear them.
Once you’ve successfully cleaned all four:
⚡ FULL POWER IS RESTORED.
Pack-a-Punch becomes available.
3. 🤖 Activate Rushmore
Head to Operations.
You’ll find the giant computer:
🤖 A.D.A.M. / RUSHMORE
Interact with the terminal.
Rushmore becomes the central character giving you instructions throughout the quest.
Listen carefully to his dialogue before moving on.
4. 🔫 Get a Ray Gun Mark II
Alpha Omega has four elemental Ray Gun Mark II variants:
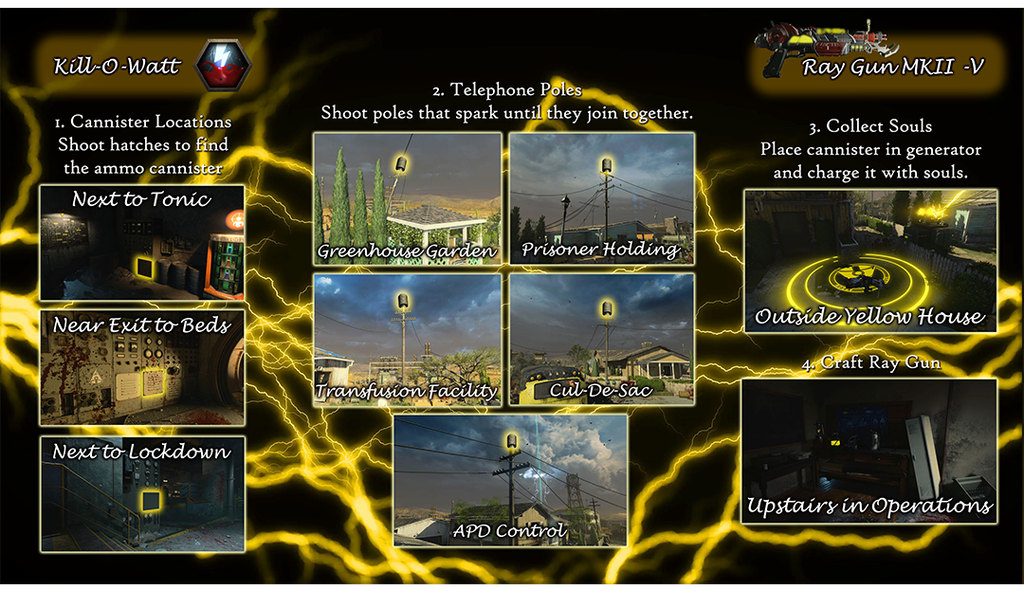
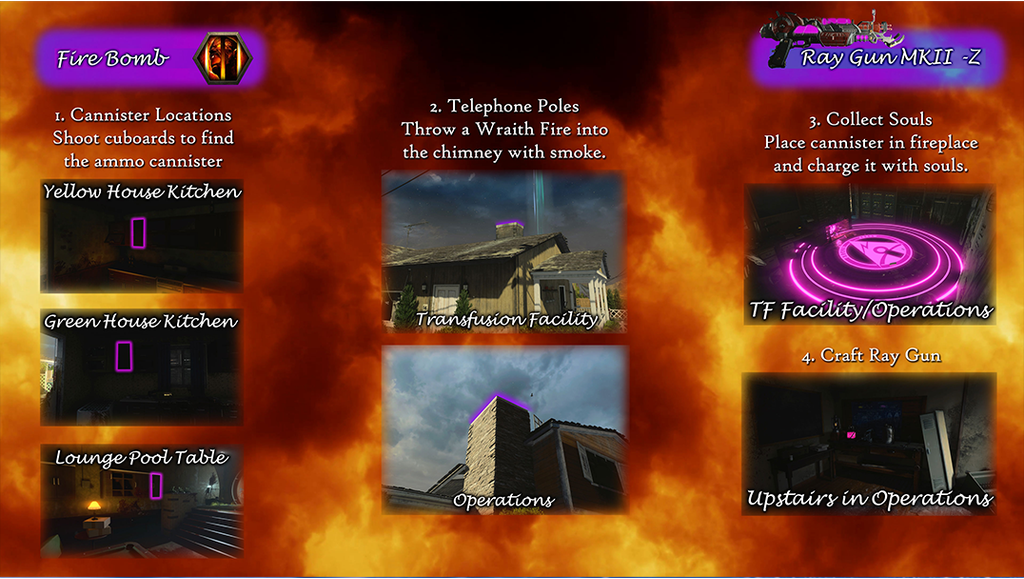
You don’t necessarily need every variant for the main quest, but they’re extremely useful.
You’ll first need the normal Ray Gun Mark II, then use the weapon frames/workbenches around the map to create the variants.
5. 🖼️ Find the paintings
Around the houses are several paintings containing hidden numbers.
You’ll need to interact with/shoot them according to Rushmore’s instructions.
Write down the numbers you reveal.
They’re used to obtain a code for the next stage.
6. 🔢 Enter the code into Rushmore
Return to Operations.
Use Rushmore’s keypad.
Enter the numbers you’ve collected in the correct order.
Successful input gives you dialogue and advances the Easter Egg.
7. 🕰️ Find the clocks
Several houses around Nuketown contain clocks.
Rushmore gives you a sequence involving them.
You’ll need to interact with the clocks and set them to the required times.
⚠️ Write the information down.
Like many BO4 puzzles, some values are randomized each match.
Once all the correct clocks have been set, return to Rushmore.
8. 📺 Television step
Rushmore activates televisions around the map.
Find the active TV.
Defend it while it broadcasts a series of numbers.
WRITE THEM DOWN.
Zombies will attack during the transmission.
When the broadcast finishes, return to Rushmore and input the code.
9. 🧍 Find the mannequin
Rushmore now wants you to locate a special mannequin.
Search around Nuketown.
Interact with the required mannequin and complete the sequence associated with it.
This progresses you toward obtaining:
🧠 THE A.D.A.M. UNIT
10. 🤖 Activate A.D.A.M.
Go underground to the storage area containing A.D.A.M.
Use the required code/interactions to activate him.
A.D.A.M. becomes friendly and begins following you.
Escort him through the bunker.
11. 🚪 A.D.A.M. opens the bunker
Bring A.D.A.M. to the required locked doorway.
He’ll scan/access the door.
This allows you to enter an area you couldn’t previously reach.
Inside you’ll obtain another important quest item.
12. 🧪 Find the canister
Retrieve the special canister from the newly accessible area.
You’ll eventually need to fill it with energy.
Take it to the required location and place it down.
13. ⚡ Charge the canister
Kill zombies around the canister.
Their energy fills it.
Special enemies may also be involved depending on the stage.
Continue until the canister is fully charged.
Retrieve it.
14. 🚀 Prepare the APD
Take the charged component toward the American Pyramid Device — APD.
You’ll begin preparing it for activation.
This is where the story starts getting considerably more interesting.
15. 🔴 Find the Elemental Orb
Rushmore sends you through another puzzle involving a glowing orb.
Find it around the map.
Shoot/interact with it.
It relocates.
Follow it.
Continue until you’ve successfully completed the orb sequence.
16. 🧟 Escort the orb
The orb begins moving through Nuketown.
Protect it as it travels.
Enemies will try to interfere.
Stay close and clear the path.
Eventually it reaches the APD.
17. ⚡ Power the APD
Once everything has been delivered, activate the:
🔺 AMERICAN PYRAMID DEVICE
The APD begins powering up.
And now you’re getting close to the finale.
⚠️ BOSS PREPARATION
Before starting the final sequence, I’d recommend:
❤️ Full perks
🔫 Fully Pack-a-Punched weapon
🔫 Upgraded Ray Gun Mark II
🛡️ Shield
💥 Full equipment
⚡ Charged Specialist
Once everyone is ready, begin the lockdown.
18. ☣️ APD LOCKDOWN
The bunker locks down.
Zombies swarm you.
You’ll encounter increasingly dangerous enemies while the APD charges.
Stay mobile and keep the area under control.
You’ll need to complete several stages.
19. ⚡ Avogadro appears
And if you’ve been with us since TranZit, you’re going to recognize this guy.
⚡ THE AVOGADRO IS BACK.
Except now we finally learn a lot more about what he actually is.
The Avogadro escapes from the APD and begins attacking.
20. ⚡ AVOGADRO BOSS FIGHT
You need to force the Avogadro through the bunker toward the APD.
Damage him to push him backward.
He’ll retaliate with electrical attacks while zombies continue spawning.
Keep hitting him.
PUSH HIM TOWARD THE APD.
He moves closer…
and closer…
until eventually:
⚡ GET HIM INSIDE THE APD.
21. 🔺 Trap Avogadro
Once he’s positioned correctly, activate the APD.
The machine traps him.
The Avogadro is contained and transported away from Camp Edward.
And here’s the fun connection:
⚡ This helps explain how the Avogadro eventually ends up at the Hanford Site—the location of TranZit.
Our BO2 journey just came full circle. 😮
🎬 THE ENDING
The cutscene reveals more about Broken Arrow and the larger Aether storyline.
Primis and Ultimis are now working together.
And Nikolai has taken control of the plan.
The crew knows there’s one final destination ahead.